GCSE Physics:
Everything you need to know about lenses
Ever wondered how one lens can turn into a camera, a microscope, or even a magnifying glass? Let's break it down in a way that makes sense – and way more fun than reading a textbook!
Play with Our Lens Simulator!
Before diving into the details, check out the Lens Simulator below:
- The red arrow is the object you're photographing.
- The green arrow is the image formed by the lens, like what you see on a camera screen.
Try this: Drag the red arrow left or right and see how the image (green arrow) changes.
Share with Your Mates
If you or your friends are studying AQA GCSE Physics, this tool is perfect for understanding lenses, and it's taken straight from the syllabus — and building your own cool projects is a lot more fun than revising from notes!
Don't forget to follow us on socials (@amershamfs on ) and subscribe to our mailing list for more cools science hacks.
Ready to explore?
Here are all the details…
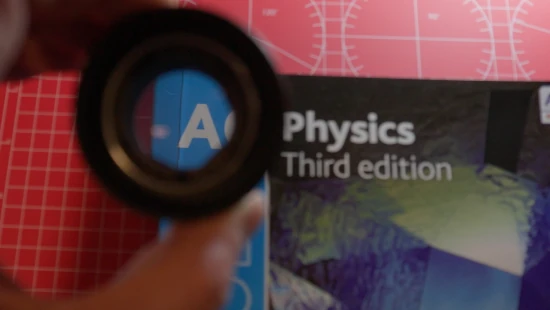
If you've been following us on social media recently, you'll have seen that we've been posting a lot of “macro” photography; “macro” photography means taking photos of very small things. Some of our videos have been of things that are only a couple of mm long, which is getting beyond macro photography and is more like building a microscope!
Some of are videos have been quite the opposite; using a camera lens to project an old colour slide onto a building or small objects, like a leaf or a small jar of gold flakes onto a painter's canvas.
We're shortly going to post some videos of using a camera lens as a magnifying glass and using a magnifying glass as a camera lens.
What's the connection between a microscope, a camera, a magnifying glass and a projector?
So, what's going on? How come we can use a camera lens to do all these different things?
If you've already had a play with the Lens Simulator above, you may have noticed that we can make the image as small or as large as we like and we can place it on the same side of the lens as the object, or on the opposite side. It all depends on the distance between the object and the lens.
Let's dive into things in more detail, so that we can understand what is going on.
Revisiting the pin-hole camera
It's really helpful to think back to our pin-hole camera. Lenses can make things seem complicated, but a lot of the physics is exactly the same in a pin-hole camera and it's much easier to understand what is happening. If you have time, please do check out our article on building your own pin-hole camera.
Here's the app from that article; drag the slider and see how lengthing the barrel, which is the same thing as moving camera sensor away from the aperture (the pin hole), increases the magnification and makes the image larger.
In the app, above, you can see that light rays coming from different parts of the image are diverging; they are moving further away from each other as the travel from the object to the sensor. So, if we make them travel further, by moving the sensor away from the pin-hole, they spread out more and the image becomes larger.
Notice also that, if you move the object closer to the pin hole, the image also gets larger. The closer the object is, the steeper the angle of the light ray that passes through the pin hole. A light ray coming in at a steeper angle travels a greater vertical distance in the same horizontal distance compared to a ray coming in at a shallower angle, resulting in a larger image.
What happens when we add a lens
The same thing is true when we use a lens; if we want greater magnification then we must either move the sensor further away from the lens, or the object closer, or both; that's why we can build a microscope by wrapping the camera lens in a cardboard tube, increasing the distance between the lens and the sensor.
Focus is not an issue with a pin-hole camera; the image will be in focus whatever the distance between the object and the aperture (pin hole) and the distance between the aperture and the sensor.
This is not the case when using a lens. A lens works by focusing (bending) the rays of light radiating out from one point on the object so that they come back together again to form the image. The rays only come together at a certain distance from the lens; too close, and they won't have travelled enough distance to come together; too far and they will have come together and started moving apart again.
So, if we try to move the sensor further from the lens, in an attempt to make the image larger, it will get larger, but it will also get more and more out of focus.
If we want a clear image, we need to work out where the rays come together and place the sensor there. And so, if we want to make the image larger, we need to move the object so that the rays come together further from the lens. The increased distance from the lens will then give us the extra magnification that we want.
Convex and concave lenses
The type of lens used in cameras and magnifying glasses is call a “convex” lens; that just means that it is fatter in the middle than at the edges. Convex lenses bend light so that the rays come back together and form an image, which is why they are so useful in photography.
The opposite of a convex lens is called a “concave” lens. These are thin in the middle and fat at the edges and bend light rays so that they spread apart.
Today, we are talking about convex lenses, so we can forget about concave lenses for now.
By the way, you may have noticed that real camera “lenses” are typically made from many individual glass lenses, some of which may be convex and some concave. Together, they have the same effect as a single convex lens though, so we can just treat them as a single convex lens.
So, what the deal with our Lens simulator?
In the Lens Simulator, the red arrow represents the object that we are photographing. The green arrow is the image that is formed when the rays of light coming from one point on the object come together again.
The defining characteristic of a camera lens is its “focal length”. When people talk about their lenses, you will often hear them describing a lens as a “50mm lens” or a “100mm lens”. They are talking about the focal length, even if they don't know it 😉.
What the focal length actually tells you is how strongly the lens bends light; it tells you the distance behind the lens that light rays travelling parallel to the axis of the lens will be brought together. A 50mm lens will bring parallel rays together 50mm behind the lens, whereas, for a 100mm lens, this distance will be 100mm. The point at which parallel rays meet is called the “focal point”; this point if labelled “F” in the Lens Simulator.
In addition to the focal points “F”, we've also marked points which are twice as far as the focal length on either side of the lens. So, for example, for a 50mm lens, the two points labelled “F” are 50mm in front and behind the lens and those labelled “2F” are 100mm in front and behind the lens.
The orange and the blue lines represent two light rays coming from the top of the arrow. We've chosen these two light rays because it is easy to work out what happens to them when they hit the lens.
Remember these two rules:
- A ray that hits the centre of the lens will continue in a straight line, without being bent.
- A ray travelling parallel to the axis of the lens will be bent so that it passes through the “principal focal point” of the lens; that is the dot “F” behind the lens.
These rules mean that we know where the orange and the blue ray will cross, and we can see where the image of the top of the arrow must be. We know that the base of the arrow will be on the axis, so we can draw the image of the arrow from the axis to the point where these two rays cross. All other rays coming from the top of the arrow will cross at the same place.
Try dragging the object left and right and see what happens to the image.
Explanation
To understand what is happening, it's best to start by thinking about what happens when the object is at “2F”; exactly twice the focal length from the lens. Then we can think about what happens as we move it closer or further away.
The object is exactly at 2F
Can you see the symmetry that occurs when the object is at a distance of exactly 2F from the lens? If you can pick up your computer and rotate it by 180° you'll see that nothing has changed, except the the object and image have swapped places.
This is because the gradient (slope) of the blue rays is exactly twice that of the orange ray; the orange ray travels a distance equal to the height of the object in a distance of 2F, whereas the (non-parallel) blue ray travels the same vertical distance in only F. However, the blue ray is horizontal for a distance of 2F. As a result, both rays take a total distance of 4F to travel a vertical distance of twice the height of the object, and so they meet at the same distance behind the lens as object is in front.
Because of the symmetry, the object and the image are exactly the same size. This is useful for “macro photography”. For instance, a large bumble bee is about the size of the camera sensor, so at 2F from the lens, it would take up most of the frame.

Most camera lenses cannot move as far as twice the focal length away from the sensor; you need to move the lens away yourself, by using an “extension tube” or a simple cardboard tube.
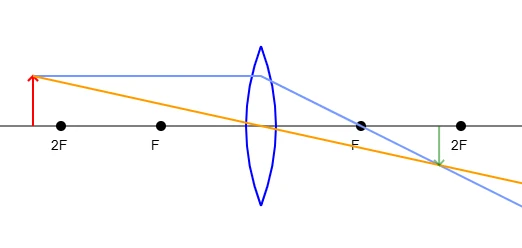
The object is further than 2F
When the object is further from the lens than 2F, the gradient of the orange line is less then when the object is at 2F. The further away the object is, the closer to the axis the orange ray is, and so the blue lines crosses it closer to the lens and the image is smaller than the object.
This is the usual setup in a camera; when you're taking a family photo, you want to fit an image of everyone onto a sensor that is only a couple of centimeters wide, so you want the image to be smaller than real life.

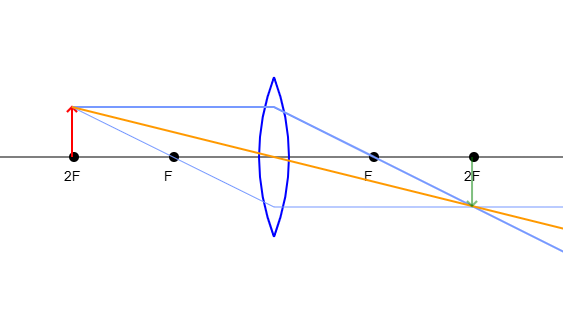
The object is between 2F and F
Now, the orange line is much steeper; the two lines cross much further behind the lens and the image is much larger than the object.
This is macro photography; we're taking pictures of things much smaller than the sensor and enlarging them to fill the frame. For example, this tiny succulent, a few centimeters tall in reality, looks like a monster!
If we move the object even close to F, then the image becomes very large indeed. In fact, as we approach F it becomes enormous. It also moves a lot further from the lens. This is useful if we want to project an image onto a building; the image could be tens of meters from the lens and ginormous!
As the object approaches F, the image moves much further back and becomes much larger. Now we've built a microscope, and can look at things too small to see with the naked eye. For example, this insect head, which is about 1mm across.
The object is closer than F
Now, the orange line is steeper than the blue one; they never cross. However, to an observer on the right hand side, looking through the lens, the rays appear to be coming from a point behind the object. This is called a “virtual” image. A “virtual” image cannot be projected onto a piece of paper or the camera sensor, but it looks real to someone looking through the lens.
Have you ever noticed that, when you look at text through a magnifying glass, the letters get bigger as you move the magnifying glass away from the paper and then suddenly disappear ? That's because image gets larger as you approach F, and then disappears off to infinity as soon as you hit F.
The object is exactly at F
This is the least interesting case, the orange and blue lines are exactly parallel; they never cross and don't appear to cross anywhere, so there is no image.
Graph of magnification
Don't stress too much about graphs and formulas! It's useful though to look at a graph of how the magnification of the image changes as we move the object. By “magnification” we mean how much bigger the image is than the object; a magnification of m=2 means that the image is twice as large. A magnification of m=0.5 means that iamge is half as large as the object.
You probably noticed when playing with the Lens Simulator that, as you approach F with the object, the image gets really big very quickly. You can see this in the graph; m increases slowly as the distance from the lens (u) moves towards the focal length (f=100mm) and then explodes as we get really close.
Over to you
Now you understand how convex lenes work? What cool projects do you think you can use them for? You can get old lenses cheaply on eBay or in vintage camera shops. If you want some inspriation, why not follow our socials ( ) or subscribe to our mailing list?